Tuesday, December 21, 2021

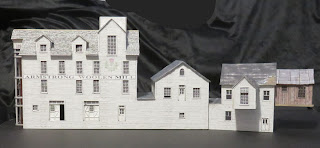
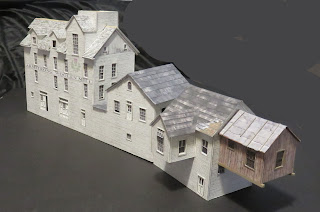
Progress on Armstrong Mill

 I still have a lot of work to do, but it is coming along. Stairs, loading dock, canopies, cupola, chimneys, vents, and scenery base are all ahead of me. The model is still all paper and card except the heavy frame of the elevator, and lots of inside bracing.

Working on a model this size -- about 15" end to end -- small dimensional errors add up. I have had a couple of head scratching moments trying to figure why two corners didn't meet the way I intended. But so far, I'm pleased with the results. My mistakes aren't too conspicuous. 

The model is a mirror-image copy in HO scale of the large building from FOS Scale Models' "Rust Rock Falls." I've named it for a friend, Amy Armstrong, who is an accomplished spinner, knitter, and weaver, and who shares my Scottish heritage.


Thursday, December 9, 2021

Armstrong Woolen Mill

 I am scratchbuilding a copy of the large structure from "Rust Rock Falls," a limited edition kit by FOS Scale Models. Working from photographs of the FOS model, I am building mine in paper and as a mirror image of the FOS kit. I made a few changes in the design and I will probably make a few more as I go along, to fit the space I have or to simplify construction. I am only modeling three sides, since the back side won't be visible on the layout. This is a photo of the FOS model from FOS Scale Models' Web site:


Below is the first wall I have completed (mostly) I will add corner trim and eaves trim when the walls are assembled. On the wall shown here, the heavy frame for the elevator is basswood, stained and sponge-painted. Everything else is paper. The walls are a texture sheet from Clever Models that I modified in Photoshop. I print the walls on 65# cardstock, laminate them to 0.5mm card (cereal boxes), and add lots of interior bracing. Windows and doors are from photos of the FOS model or from my "digital parts bin." (I collect digital images of doors and windows the way some people collect stamps.) 


Eventually, the model will be mounted on a hillside with a small dam beside it and a rocky ravine below it. For terrain, I will use chunks of foam, plaster rock castings, and lots of Sculptamold. It will be located about halfway between the two terminals on my U-shaped shelf layout.

The mill is named after Amy Armstrong, a long-time friend and spinner, knitter, and weaver. This mill replaces an earlier design (below) that I never built. I still like this design, and I might build it someday as a diorama. There won't be room for it on the layout.


I will post more photos as I make progress on the model.


Tuesday, November 23, 2021

Sky Backdrop for My Shelf Layout

 I want a particular kind of backdrop for my shelf layout, and I created this one in Photoshop. Each panel is 150" x 11", and the ends blend according to code (A/B/C). What I have posted here is a small version @ 300ppi & 250kb. You could download this and expand it to full size. At 72ppi, the full-size panels don't look pixelated.

Or you could send me an email address, and I will send you the full-size file -- about 2mb. The height of the file is 36" because that's the size my local print shop uses for banners.


Sunday, November 14, 2021

Ceresco & Wolf River Railroad 2.0

My solution to the wiring debacle (see next post below) was to tear everything down and start over. As of today, 14 Nov 21, the new benchwork is mostly up and I have laid, wired, and tested about one third of the track, testing every section as I go. I should have much of the track laid and wired by Thanksgiving.

I'm using Peco Electrofrog switches everywhere, and I'm isolating each switch electrically to ensure that there are no more shorts. The two turnouts I had to discard were both bought used on eBay. I've since spent the money to buy only new turnouts, and so far all of them have been flawless.

The new 9'x17' U-shaped shelf layout is based two published layouts from Model Railroader:  David Leider's "Soo Line on a Shelf" from the June 2008 issue, and Art Fahie's "Wharf Street" S-scale plan that appeared in Great Model Railroads 2014. I condensed the long shelf on the Soo Line layout to 9 feet. I scaled Wharf Street to HO and added a hidden track that will allow continuous running and serve as a small fiddle yard. 

Between the two is about 20 feet of single-track main line running though mostly scenery. I'll put my scratchbuilt version of South River Model Works Martin Machine in a corner, and I'll put my FSM Cartwright's Machine Shop somewhere in the woods. Most of the structures on the layout will be scratchbuilt in paper or FOS Scale Models kits. My scratchbuilt covered railroad bridge has been waiting many years for a favored spot on the line. It will have one now.


I will run short trains to serve the few industries on the line and to interchange with C&NW and Milwaukee Road.

This afternoon, the layout space looks like bomb damage as I clean out the rubble from layout demolition and reconstruction. I will post some photos when I get it cleaned up.


Saturday, October 23, 2021

I HATE Wiring!

 I hate wiring. I HATE IT!! I have the entire module wired and control panel built and installed, and now I have two sections of track that are dead for no reason that I can find, and a turnout that, if I throw it for the siding, EVERTHING goes dead! I'm going to have tear the whole &^%$$#@! thing out and start over. I don't know what else to do.

After a good night's sleep, I woke with a more positive outlook and a plan. I'm going to start over with a much simpler track plan -- fewer turnouts, no reversing wye, maybe a turntable (maybe not). And I will test everything as I go along. I'm not building for operation. Structures and scenery are my favorite pursuits. I won't say I would be satisfied building a basement-sized diorama with no railroad, but a single-track main line with a few sidings, a loop for continuous running, and a few well-detailed scenes will keep me quite happy.

Thursday, October 7, 2021

DIY Tower-Style Manual Turnout Throws

On my next module, I wanted to control turnouts manually using something like the commercial levers pictured below. Then I found out what they cost. When I started breathing again, I sat down and worked out an inexpensive alternative using old SPST toggle switches and some brass stock.

I use Peco Electrofrog switches and DC cab control, so I don't need the levers to route power or to apply tension to the switch rails. I just need the levers to flip easily and hold position. But it would be relatively easy to add power routing, or to control signals with the levers by using DPDT toggles instead.
I will use steel wire to link the levers to the turnouts, and I will mount the levers on (or recessed into) the fascia. With a rigid baseplate, it should be easy to build a bank of 4 or 5 levers (or more) and locate them near my HO scale tower.
I won't take credit for this idea; I probably saw it somewhere, some time ago. I've seen other DIY switch levers, but this seems to be the simplest to build, and I certainly like to keep things simple.


Following a suggestion from someone on Facebook, I have decided to use bicycle shift and brake cables to link the levers to the turnouts. I can buy enough cable and guide for one module for about $10 and it will be easier to rig and adjust.

Wednesday, August 4, 2021

My New Bedford Whaleboat is in FineScale Modeler magazine!

 My paper model of a New Bedford Whaleboat is featured in the Reader Gallery of the September 2021 issue of FineScale Modeler. The hull and sails of the model are from Fiddler's Green. Almost everything else is scratch built. The editor's photo caption calls the model a "showstopper." Wowie! Zowie!


Tuesday, July 20, 2021

Lisunov Li-2D - 1/33-scale paper model

Several years ago, I started repainting FlyModel's C-47 kit as a World War II era Lisunov Li-2. The US provided hundreds of C-47s to Russia under Lend-Lease. The Russians built C-47s under license. The Lisunov Aircraft Factory built a near-identical knock-off, and never acknowledged that it was an American design. The Li-2D I'm modeling was a WWII paratroop transport and glider tug. Some of the Li-2s were fitted out as transport/bombers or photo recon ships. Like the DC-3 in the US, the Li-2 became a mainstay of post-war Russian civil aviation.

After I finished repainting and printing the kit for my father's C-47, I went back and looked at the Li-2 repaint. It was nearly finished. So I have now finished it, except for a few bits that will have to be repainted during the assembly process, and my plan is to build the two in parallel. Together, they should make an interesting display.

"Repainting" the two kits was done in Photoshop Elements. For the C-47, that meant painting out the invasion stripes and changing the squadron and aircraft markings. For the Li-2, it involve all of that plus adding camouflage and Russian insignia, and modifying several components to match photos.


Printing will be a tedious process because the original sheets are 16x11 inches and my printer can only handle letter and legal size cardstock. So l'll have to use Photoshop to slice up the pages and rearrange parts to fit my printer.

Saturday, July 17, 2021

My Father's "Bird"

 It took me a week of scanning, scaling, repainting (in Photoshop), and printing the FlyModel paper kit, but I finally have a 1/33-scale paper kit of my father's C-47. Now it's time to start building.


The C-47 "Argonia" depicted in the FlyModel kit was the plane of Col. Charles Young, whose hometown was Argonia, Kansas. Young was CO of the 439th Troop Carrier Group. My father flew as a copilot in Argonia with Col. Young when Dad first arrived in England. The Argonia is preserved at the D-Day museum in Normandy, France.

Removing the invasion stripes was the most tedious part of the repainting process. My father and his plane arrived in England two weeks after D-Day and never got the stripes. Repainting the kit also involved changing the squadron and plane markings. Printing involved first scaling the scans by comparing their dimensions to the printed kit, then dividing up the parts (in Photoshop) to print parts from 16"x11" originals on letter-size and legal-size cardstock -- a lot of fussy work.

Wednesday, June 30, 2021

Progress on the 1/25-scale diorama

 Structure completed and most of the detailing done. The structure is about 13" z 8". A few more details to add to the interior, then it's on to the base.


Friday, June 11, 2021

1/25-Scale Garage Diorama

 My friend Bob Kremer, a superb plastic car modeler, is building a model for me of one of my dream cars -- a 1934 Ford four-door sedan. In return, I'm building for him a 1/25-scale garage diorama to display and photograph his amazingly realistic car models. This is a new scale for me, nearly four times the size of my RR structures, but it's been interesting and fun.

The interior walls are a paper texture sheet from texture.com, framed with basswood that has been stained with my alcohol-&-shoe-dye weathering goop. The windows and doors are also paper -- the windows built up from the wall texture sheet, the doors from my "digital parts bin." I will add exterior walls, wood floor, and partial roof, all from paper textures framed with basswood. Then I will clutter it up with lots of paper details -- posters, signs, tools, toolboxes, parts boxes, and cans, maybe some tires and a few car parts.

I'm enjoying the project, but I'm awfully glad my model RR isn't 1/25! I would need a much bigger workbench, to say nothing of a bigger basement.


Sunday, May 30, 2021

Kendall Printing - 1/87 scale - FOS Scale Models kit

 This is another laser-cut wood kit from FOS's Kit-of-the-Month Club (KOTMC). It was a nice little three-evening project. I painted the walls grey, then sponge-painted them white. Doors and windows were painted grey and sponge-painted green. The large sign was applied following FOS's instructions and weathered with light sponge painting and dry brushing. 

The loading platform railings and supports looked almost too delicate at first, but with careful handling, they were fine. Laser cutting has come a long way. I painted the platform engine black and dry-brushed it with rust.

For the tarpaper roof, I substituted planking and tarpaper texture sheets from Paper Creek (no longer in business), with each row of tarpaper applied separately.

My only complaint was the hoist:  the kit put the upright too close to the building. I substituted a longer  cross-beam on the hoist to make room for a truck to back into that space. I stained the hoist beams with my alcohol-&-leather-dye weathering "goop." 

The KOTMC kits are delightful little projects that can be built as is or kitbashed into larger structures. They are also a great way to learn and practice new techniques.


Witt Manufacturing - 1/87 Scale -- A Tribute

 Witt Manufacturing is my scratch-built copy of one of the buildings in FOS Scale Models' "Printer's Row" limited edition craftsman kit. The corrugated metal came from Paper Creek (no longer in business); wood siding, tarpaper roofing, and brick pavement are from Clever Models. I used Photoshop to make the roofing lighter and more faded. The tall chimney is a soda straw wrapped in paper -- a printed metal texture from texturelib.com. Details come from Walther's and Fine Scale Miniatures. Windows and doors paper are from my digital parts bin.


The fire stair is basswood with railings from Caboose Industries and risers from Northeastern. I painted it medium green, weathered it with my alcohol-&-leather-die wash, and dry-brushed it with rust. The landing has an open grid made with mesh fabric.

The walls and roofs of my scratch-built structures are 0.5mm card (cereal boxes) covered with texture papers and braced heavily inside with basswood and balsa.

My friend Roger Witt was a member of our IPMS chapter in Oshkosh, WI and a skilled and prolific scale modeler. He built railroad models for hire and mostly WWI aircraft for fun, casting and scratch-building lots of details as he went. I learned a lot of "tricks" from him. Roger passed away in 2020 and the IPMS chapter is holding a scale model contest in his memory. This is my entry.


In the FOS kit, the low wall butts against an adjacent building. I added the metal door and the large exhaust vent -- both paper -- from my digital parts bin.


Friday, May 7, 2021

Background Buildings for Scots' Landing - Scratch-built HO Scale Paper Models


These structure and others will be placed along a road that will climb along the backdrop of my Scots' Landing module. I'll build the hill and the road on the bench and then place it on the layout.
I'll need a few more houses and a medium-sized factory to fill out this four-foot chunk of HO scale landscape.

The green house on the right is Clever Models' "Small Chicago House" (S14). The other two are kitbashed versions of the same kit. The porch on the left uses fine cloth mesh for window screen.

This building is scratch built from a photo on the Internet. I widened it by adding the vertical row of windows on the left. The side walls are Clever Models' "Cream City Brick" texture sheet. I haven't decide what kind of business this will house so there is no sign yet. Roof details include a scatchbuilt hatch, some scrap lumber, and a sand barrel and shovel from Fine Scale Miniatures.

The boarding house is scratch-built from photos of one of the buildings from the Builders In Scale "Waterfront" kit. The photos were from Vilius Bileisis' amazing blog, The storefront will probably end up being a cafe but I am so far undecided. Walls, windows, doors, and shutters came from Vilius' photos. The shingles and chimney are from Clever Models.

The stone & wood barn is scratch-built from a photo on the Internet. It might be someone's craftsman kit, I don't remember where I found it. The stone walls are from Textures.com, the wood walls, roof, doors and windows are from the Randsburg Barbershop kit by Paper Creek, now available free from Papermodelers.com. All were modified in Photoshop. This will be a cabinet shop but I have not yet decided on a name.

The grocery store is a scratchbuilt copy of a model photo I found somewhere on the Internet. Wall texture, windows, and doors are from Clever Models' texture collections. The image in the large windows and the wall signs are images from the Web. I'll put some produce crates in the entryway when they arrive from Model Tech Studios.




Tuesday, April 20, 2021

Three More for the Ceresco & Wolf River

 The Wet Whistle Tavern and the tinshop will be part of the back scene at Scots' Landing -- a somewhat run down commercial street climbing the bluff. They are paper models, scratch built from photos. I don't have a spot for the produce co. yet. That is also a paper model scratch built from plans.

All three are HO scale (1/87) and built with texture papers from Clever Models, Paper Creek, and ScaleScences, and windows & doors from my digital parts box. The sheet-metal roof on the tinshop came from The Texture Library (texturelib.com).

The tinshop was a limited edition O-scale kit from Stoney Creek Designs in 2018. I scanned a photo from their ad in Narrow Gauge & Shortline Gazette to make mine in HO scale. The Wet Whistle was a 3D digital model from (I think) Turbosquid. L.Baker Produce is a FOS Scale Models kit.

One of the advantages of paper models is the ability to use photos, scans, and screen captures of real buildings and models -- plus Photoshop -- to create my own scratch-built models.


Tuesday, April 6, 2021

Three Background Structures for Scots' Landing

 Against the backdrop of my HO scale Scots' Landing module, I am planning a commercial street climbing a hill to the bluffs above the harbor. The businesses along the road have seen better days but they hang on, serving the river folk at Scots' Landing and people from the town up above. I recently finished three more structures for that street. Once in place, they will be 22 inches from the front edge of the layout.

The Caledonia Hotel is a scratchbuilt paper model, a compressed version of  McGee's Hotel from Microscale Models. I used photographs of the kit from Villius Beleisis' amazing blog at viliussm.blogspot.com. Villius' scale models are masterpieces.


Wishy Washy Laundry is also a scratch built paper model. The front walls are based on a photo of a model from somewhere on the Internet. I've modified it and added the sign and name in Photoshop. If you know whose kit and whose build it was, let me know so I can give proper credit for the photo. The side walls are a Clever Models clapboard sheet, the shingles are from Paper Creek (no longer in business), and the vents are from Walthers.


The coal dealer is a paper model kit from Clever Models. I widened it by moving the vertical "COAL" sign to the front of the building, and I added some roof detail.


The street will be about four feet long, so I have lots more storefronts to build.